Are you yearning to infuse your digital footage with the timeless allure of Hollywood’s cinematic charm and stumbled upon Dehancer Pro?
Achieving that authentic film look often entails a significant investment of both time and money, from purchasing specialized cinema cameras and lenses to mastering the intricacies of film development. But film emulation plugins like Dehancer provide a way to bridge the gap between digital and film aesthetics without breaking the bank or sacrificing endless hours on post-production.
Dehancer is a film emulation plugin that is rapidly gaining traction in the filmmaking community and seamlessly integrates with DaVinci Resolve, Adobe Premiere or Final Cut Pro. With over 683,000 installations as of this writing, Dehancer offers filmmakers a simple way to achieve that coveted “film look” with their digital hybrid video cameras.
We delve into the features, pros, and cons of the Dehancer plugin, exploring whether it’s the right choice for you in achieving that coveted cinematic film look via this video review and article.
Use my discount code KURIOS for 10% OFF your purchase of Dehancer.
Why Dehancer?
Dehancer isn’t just another run-of-the-mill colour grading tool—it’s a game-changer.
With its film emulation capabilities, Dehancer allows you to transform digital footage into a visual masterpiece reminiscent of classic Hollywood films or old-school film reels.
Whether you’re a seasoned filmmaker or a novice exploring the world of colour grading, Dehancer offers a user-friendly interface and a comprehensive set of features to suit your needs. From emulating popular film stocks to fine-tuning grain intensity and applying halation effects, Dehancer empowers you to experiment with various film looks and colour grades quickly.
Is It Worth It?
Before diving into the intricacies of using Dehancer, let’s address the fundamental question: Do you need it?

I’ll be honest. When Dehancer reached out to me to try their plugin for this review, I was a bit skeptical on how useful it would be for my production. The film look is not something I utilized much in my projects, so I wasn’t convinced that this would be a product I’d recommend or use much. However, I was pleasantly surprised once I started using it.
For many filmmakers, particularly those on a tight budget or still honing their craft, investing in additional tools may be unnecessary. After all, mastering the fundamentals of filmmaking—from lighting and composition to storytelling—is paramount before delving into advanced post-production techniques. A plugin won’t fix poor fundamentals.
However, for those seeking to elevate their creative projects with new film styles, Dehancer offers a compelling array of features. Its top-of-the-line film grain emulation, alongside halation and bloom effects, gate weave, film breath and damage, overscan and vignette, can add depth and authenticity to digital footage. Moreover, with its ability to emulate popular Hollywood film stocks such as the popular Kodak Vision3 series, Dehancer provides a versatile toolkit for filmmakers aiming to replicate specific cinematic aesthetics.
Here are two recent projects I used Dehancer on to get a subtle film look.
I think they turned out really nice, and having Dehancer definitely sped up the process to get this look fine tuned.
Yet, it’s essential to acknowledge that not everyone may benefit from Dehancer’s offerings.
For hobbyists or beginners dabbling in film-style projects, the full plugin may be a bit expensive, in my opinion. However, for professionals engaged in cinematic-style filmmaking or seeking to impress clients with film-like visuals, Dehancer could prove to be an indispensable tool and well worth the investment.
Achieving the Film Look with Dehancer
With Dehancer, achieving that elusive film look for documentaries, short films, and commercial projects has never been easier. Seamlessly integrated into the editing software, Dehancer offers a streamlined workflow that makes a lot of sense. It is added as an effect to a layer or node and the layout of its expandable menus makes a lot of sense as you work on your colour grade.
Dehancer offers some of the most popular motion picture film stocks such as Fuji Eterna Vivid 500 (Exp. 2013), Fuji Reala 500D (Exp.2013), and the Kodak Vision3 series (200T, 250D, 500T and 50D). It also offers a wide list of colour negative and positive films, black and white films, instant films, and more. It also has an ever-expanding list of supported camera profiles from all the major brands such as Sony, BlackMagic, ARRI, Canon, DJI, RED, Fuji, and even iPhones plus more being added.
The integration of camera profiles to convert your LOG footage to Rec.709 right inside of Dehancer helps with simplifying the workflow for projects requiring a quick turnaround.
Some of the stand-out features of Dehancer are its Film Grain, Halation and Bloom emulation.
The grain emulation is top-notch and looks like actual film grain which interacts with the underlying image instead of just being an overlay on top of it. With the film grain, you have the ability to decrease the resolution of the image similar to what you would see from footage shot on film which does not have the super-sharp look of digital footage. This effect is quite natural and can be adjusted to be as strong or subtle as needed, giving great control over the final look. The grain can also be tweaked in terms of its chroma, and fine-tuned in the amount it shows up in the shadows, mids and highlights. This level of control over the look of the grain really helps video creators tune in their “film look” without being distracting from the overall image.
The bloom effect produces a soft, misty glow around highlights and can be used to give your footage a pronounced dreamy feel, or subtly to replicate the look of film footage. The presets for 8, 16, 35, and 65mm film and the fine controls that Dehancer offers allow you to have exact control over the level of the effects you apply. This makes it a very versatile tool for directors and colour grade artists.
Halation is probably one of my favourite effects from Dehancer. It emulates the subtle red glow around bright light sources, specular highlights and contrasting edges that you get from footage shot on film. It’s one of those effects that, unless you have shot on film a lot, is something you didn’t know you were missing. (At least for me it was that way!) It’s yet another level of detail that Dehancer makes available to achieve authentic film looks and adjust to your liking.
Also, the film damage on Dehancer has really nice controls for the amount, level and frequency of things like dust, hairs and scratches as well as a randomizer to give a more natural feel. The plugin as a whole feels very well thought-out and implemented.
However, despite its myriad capabilities, some users may encounter minor annoyances, such as the default effects it has enabled upon application.
I wish that there was a way to quickly disable all effects on a new Dehancer node so that you could start from a blank slate. But you can simply save a preset of the plugin with all the settings disabled and solve that problem quickly.
Also, some people may experience performance slowdowns in certain editing software depending on their system specs. However, for myself, editing on an M2 Max Macbook Pro with 32GB of unified memory, I saw a minimal hit to performance through the majority of my normal colour grades. It was only when doing more complex colour grades with things like stabilization, noise reduction, intricate masking and face enhancements that I saw any significant dip in playback performance. But these may have been more due to the stack of other effects I had in those colour grades than due to Dehancer itself.
However, these minor drawbacks are outweighed by the plugin’s overall effectiveness in delivering cinematic-grade results.
What About the New Film Look Creator?
As many of you know, with DaVinci Resolve’s recent updates, they’ve added a new film look creator effect that has some similar features to Dehancer such as Halation and Bloom. So, why pay for a plugin when this comes with DaVinci Resolve?
Well, the truth is that—yes, you can achieve some fantastic results just with the effects and grading options that come stock with DaVinci Resolve, especially after version 19’s updates.
Here’s a project I graded just with DaVinci’s stock film look effect and colour grading tools.
I think you can definitely get some really great results just with what comes stock in DaVinci.
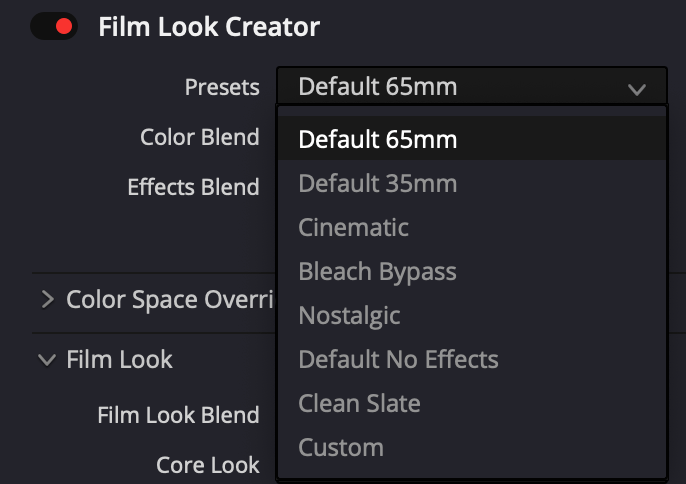
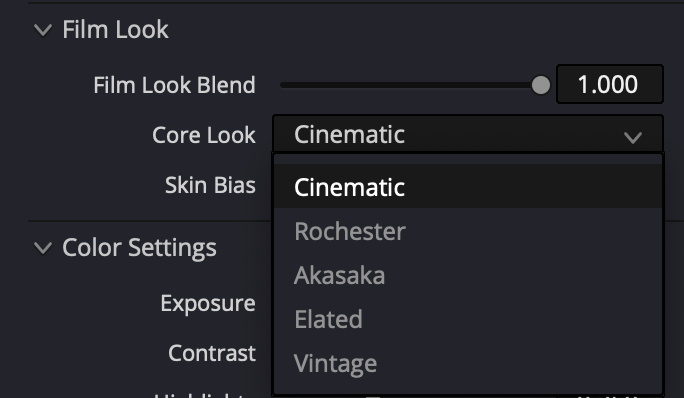
However, you are more limited with the amount of film stocks that you can emulate from presets.
Currently, DaVinci’s Film Look Creator only has 7 presets, which are pretty bland in my opinion. In terms of film stocks that you can emulate—the Film Look Creator focuses more on what it calls a “core look”. You can choose from Cinematic, Rochester, Akasaka (which I keep reading as Alaska), Elated and Vintage. These core looks do give a nice effect to footage, however, it’s a pretty short list of choices compared to the long list of over 60 film stocks you can accurately emulate using Dehancer.
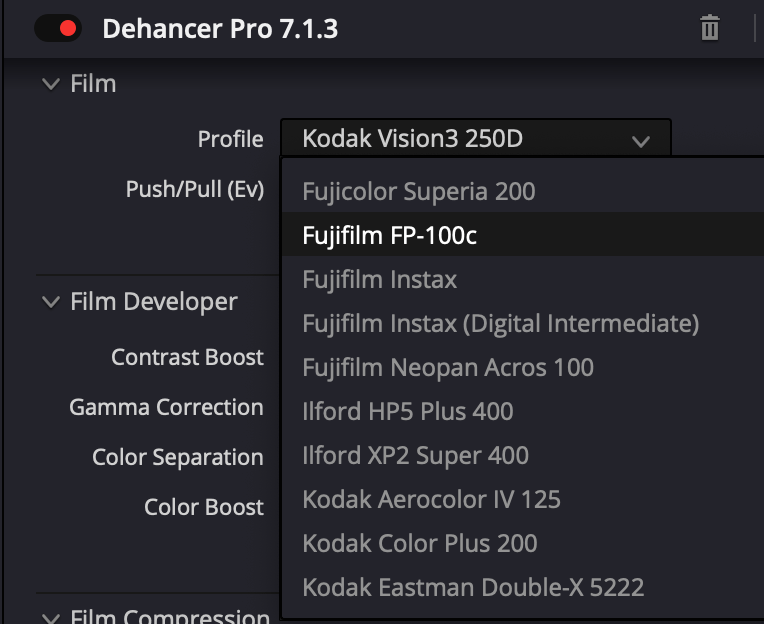
Additionally, with Dehancer you can emulate film printing, which is the final stage of analogue cinema production. Dehancer currently offers 2 motion picture print films: Kodak Vision Color Print Film 2383 and Fujicolor Positive Film Eterna-CP 3513DI. These add another layer of film looks that you can easily acheive with the plugin.
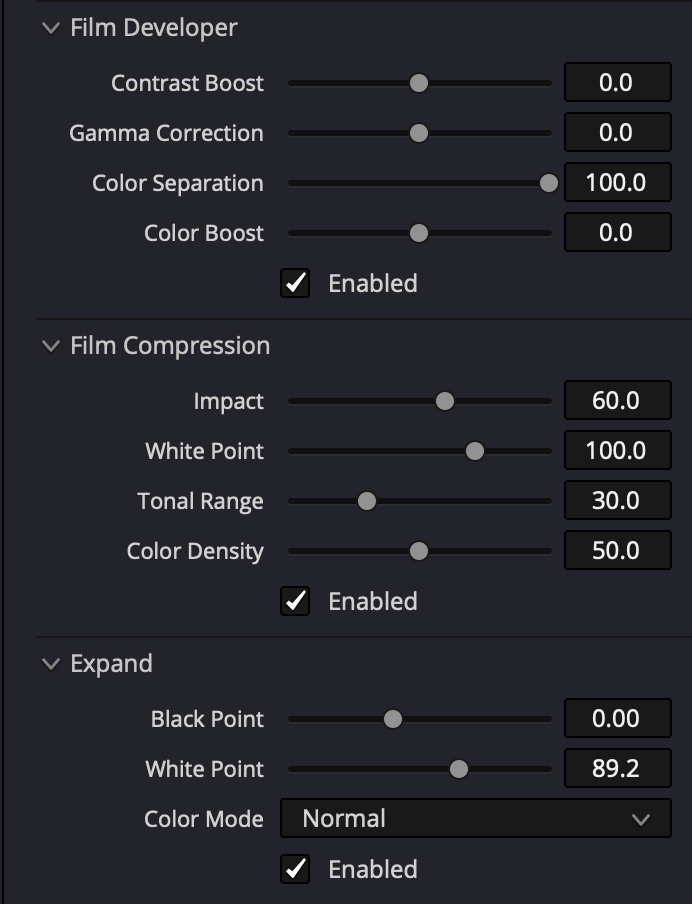
Where Dehancer outshines the Film Look Creator is the fine tuning you have access to. With the Film Developer, Compression and Expand, you can really shape the look of the film stock you’re emulating with controls for Colour Separation, Boost, compressing the white point and tonal range, adjusting colour density and even expanding the black and white points to simulate the effect of shooting on film.
In terms of the Halation and Bloom effects, both DaVinci’s stock effects and Dehancer produce good results. I wouldn’t make this a big point of difference between the two.
However, film grain definitely looks better with Dehancer to me. This is because Dehancer’s Film Grain is not just scanned and overlaid like most other plugins. Instead, its algorithm rebuilds an image with little granules, based on colour and brightness details—producing a much more true-to-film look for the grain, and grain that accurately interacts with the image the way it would on film. It’s hard to explain, you have to see it in motion to see the difference.
But again, if that’s not a big deal to you—then don’t sweat it. For me personally, I don’t usually do film looks with heavy grain for my projects—so while having Dehancer is nice as an option. I wouldn’t consider it vital to the majority of my projects. However, it does save me time when I do have a project that requires it—and that’s definitely worth something!
Bottom line is that you can get some fantastic film looks with the stock Film Look Creator in DaVinci Resolve—it just may take a little longer to set up and is a slightly different workflow. For me, I like having both and I often choose one or the other depending on the project needs. You’re going to have to figure out if your type of work or style would benefit from Dehancer or not.
Price Comparison
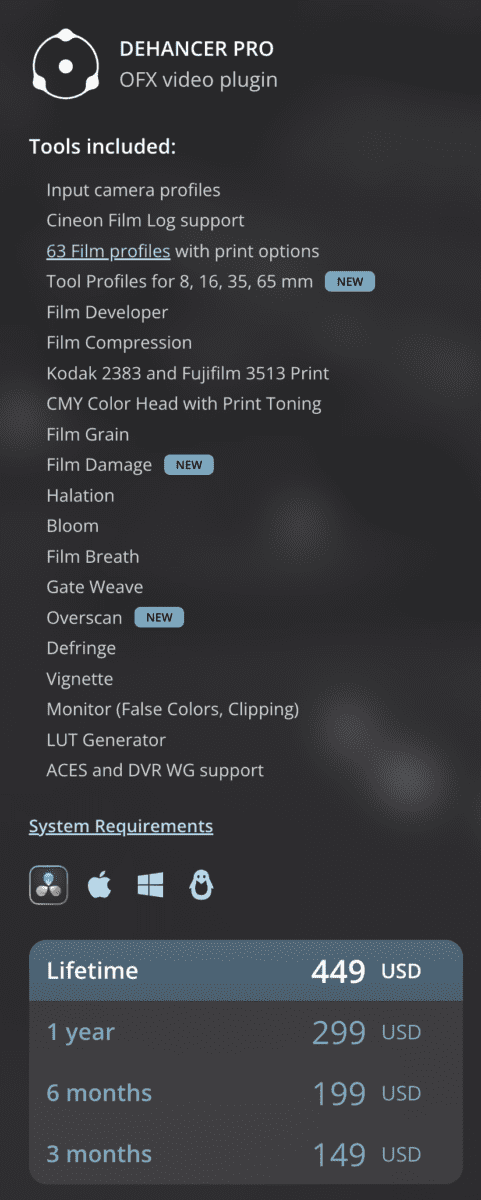
In terms of pricing, Dehancer occupies a middle ground between cheaper alternatives (such as Filmconvert – $129 USD – and Koji – $199 USD) and premium offerings (such as Filmbox which is $999 for a perpetual license). Dehancer’s full perpetual license is $449 USD—which is not “cheap” but also not terribly expensive when you consider the cost of many video productions.
With multiple tiers catering to different budgetary needs, including a Lite version and separate add-on packs for specific effects, as well as lifetime and subscription plans for each pack, Dehancer provides flexibility and affordability for filmmakers of all levels.
You can get a Lite version for $199 USD which gives you 63 different film profiles, Film Grain, Bloom, Defringe, Vignette and some other features which – to be honest – might be good enough for a lot of people’s needs. It doesn’t include features like the Film developer, film damage and compression, or gate weave and halation. But, you may not need those and you can also purchase single packs for $99 USD for Bloom, Grain, Breath and Halation separately to add on later.
One nice thing is that you can download a free trial to give Dehancer a test run before you commit to purchasing. I’d highly recommend doing this before your purchase to make sure it is the right tool for your needs.
Conclusion
Ultimately, while Dehancer may not be a magic bullet for transforming mediocre footage into cinematic masterpieces, it offers a valuable toolset for enhancing the visual appeal of digital projects. Whether it’s saving time on post-production or unlocking new creative possibilities, Dehancer stands out as one of the premier options for achieving the elusive film look in digital video.
For me, if I were not using this in a paid production, I probably wouldn’t buy it. However, even though I may not have bought it on my own initially, having it opens up possibilities that I didn’t have before—which is something for you to consider. I can now efficiently try out different film looks on my client projects which I would not have done before because of time. This ability to expand the range of creative possibilities I can offer to clients is worth considering whether it would be a good investment for you.
Truly, it was difficult for me to find any major cons to Dehancer after using it for a while… and I was looking for them!
Aside from considering the cost and the minor drawbacks of the program (which may be improved in the future), Dehancer seems to be one of the best options on the market for achieving the film look in digital video. It has a good support team, great documentation and tutorials available, and is available for all the major editing programs. They also seem to release regular updates to improve the program and listen to user feedback.
So, consider whether it would be a profitable tool to have in your kit and what the ROI it could produce for your situation.
If you do decide to purchase Dehancer, please remember to use my code “KURIOS” at check out for a 10% discount.
I receive a small affiliate commission from Dehancer for every purchase using my discount code which helps keep this site running and helps me put out more educational content for free to you.


